Pilot GPS (AeroPad)
The Pilot GPS app for AeroPad is a powerful tool you can use to track your flight on a moving map, get airport and weather information and more.
Getting Started
In order to use the Pilot GPS app, you first need a free MapBox API key saved in LRM to view the map. See our quick guide on how to do this.
You will only need to do this once. If you have not set your API key correctly, the Pilot GPS app will display a message advising you to set up the API key. Refer to the above guide again and follow it carefully.
Powering On the Pilot GPS
On the AeroPad home screen, click or tap on the Pilot GPS app to open it.
If you have correctly configured your MapBox API key, you should see something similar to the following:
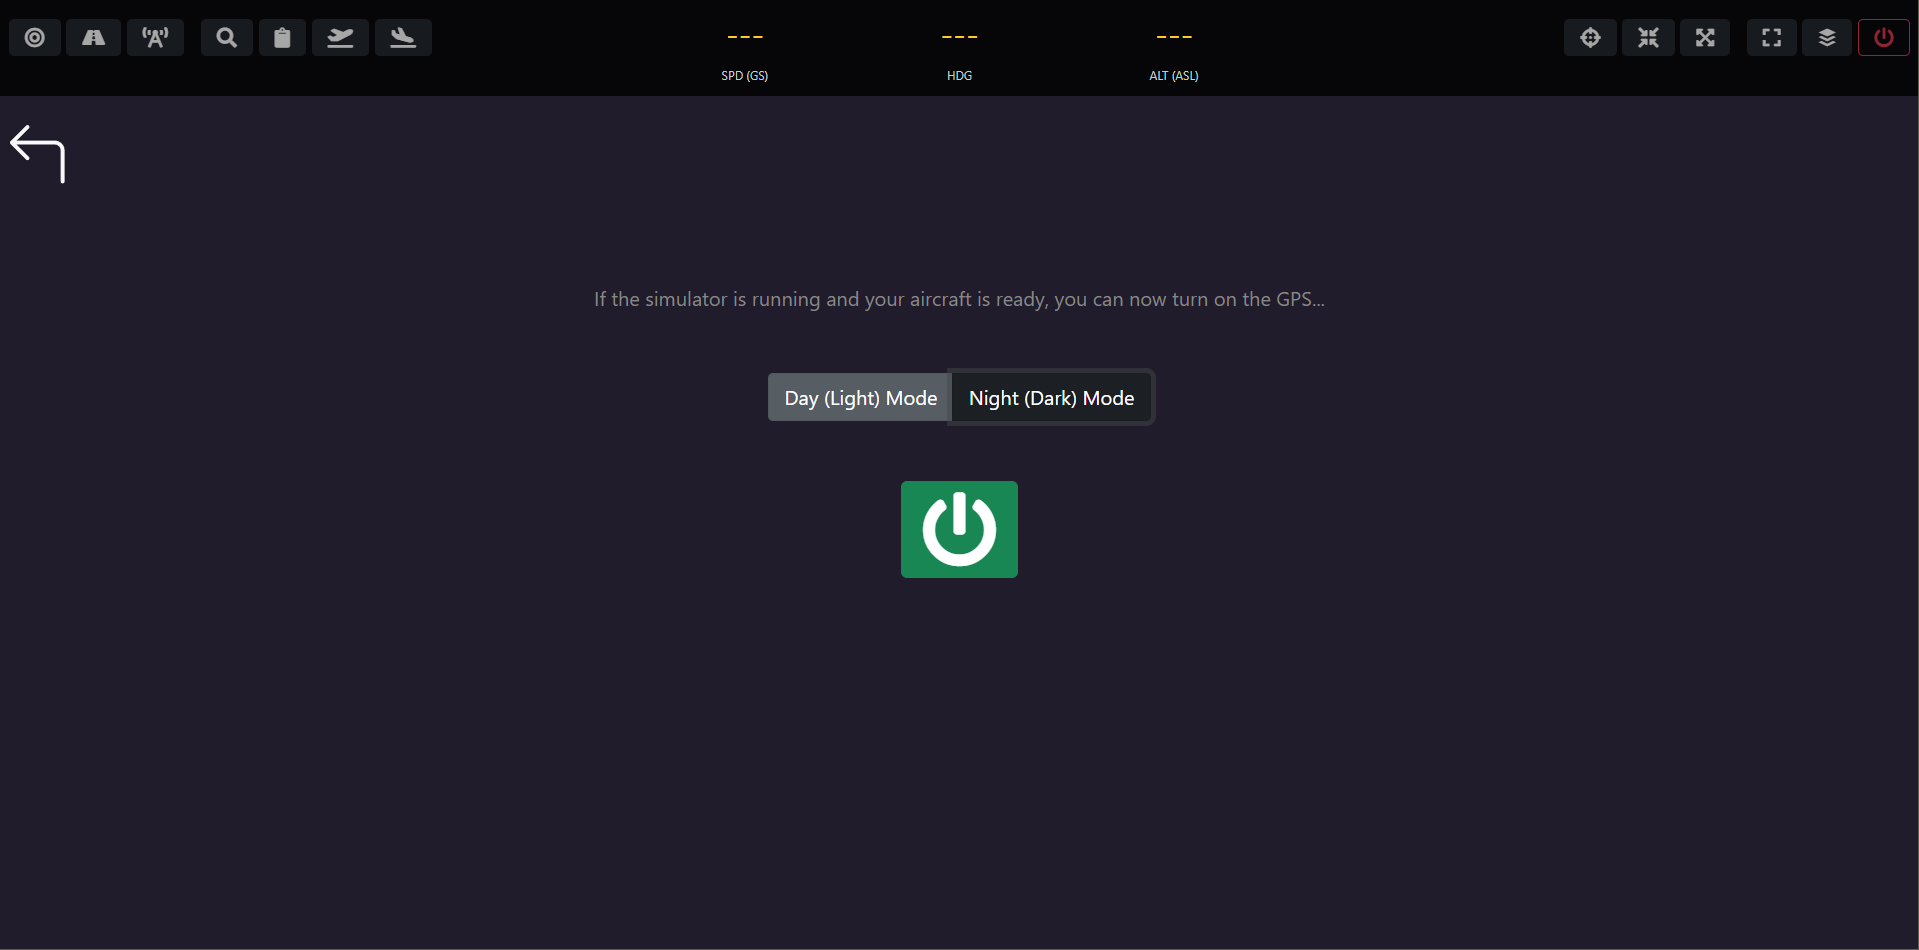
To power on the Pilot GPS, select the map theme you prefer (Day or Night mode) and then click or tap the green power button. This will display your current aircraft position on the map, as well as a few at-a-glance stats at the top of the display.
Getting to Know the Pilot GPS
There are many useful features packed into the Pilot GPS app. To access them, use the toolbar at the top of the display. The various buttons are labeled here.
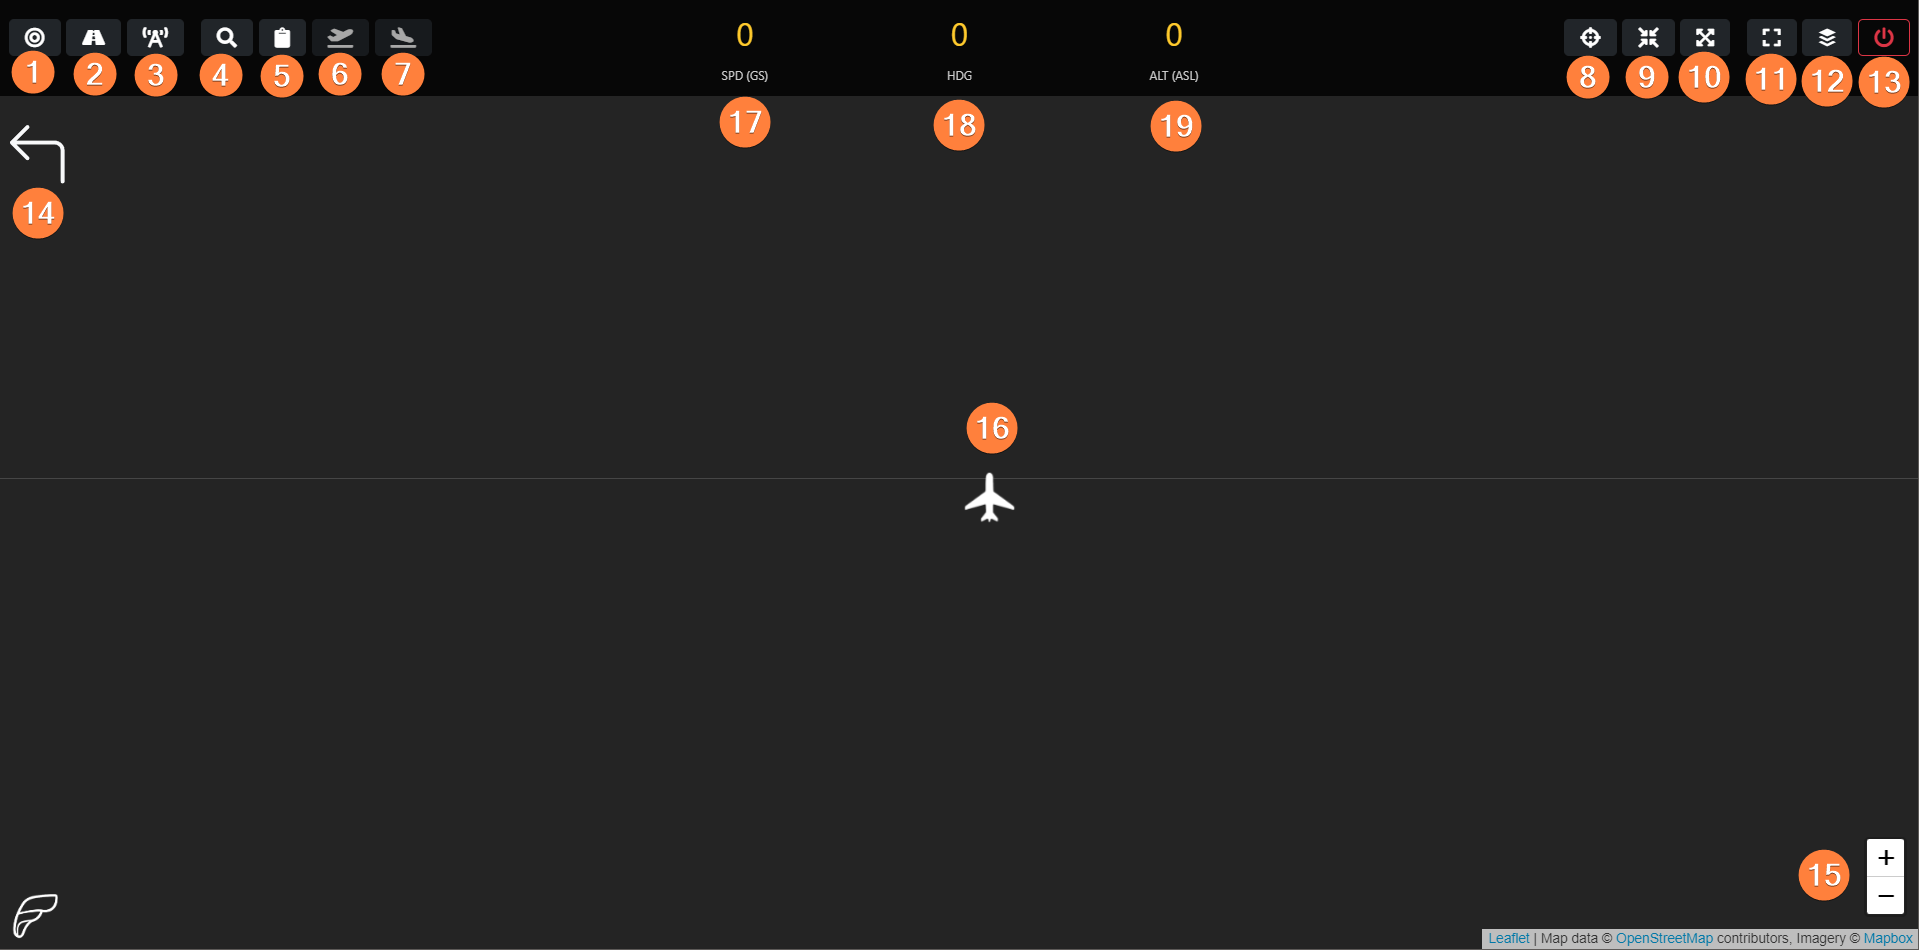
- Range Rings: Toggles the display of range rings at 20nm increments out to 100nm. The range rings are always centered on your aircraft's position.
- Nearby Airports: Toggles the display of nearby airports on the map.
- Nearby Navaids and Waypoints: Toggles the display of nearby navaids such as VORs and NDBs, as well as GPS waypoints and intersections.
- Airport Finder: Allows you to search for any ICAO code and get that airport's information, if available.
- Display Flight Plan Route: Toggles the display of your planned flight route on the map. This requires an active flight plan route set via LRM's Map > Route plan window, or via FsHub's My Flight Plan page.
- Departure Airport Information: Displays the information of your flight plan's departure airport. This requires an active flight plan route set via LRM's Map > Route plan window, or via FsHub's My Flight Plan page.
- Arrival Airport Information: Displays the information of your flight plan's arrival airport. This requires an active flight plan route set via LRM's Map > Route plan window, or via FsHub's My Flight Plan page.
- Center Aircraft: This button will center the aircraft on the map display.
- Zoom In: This button will zoom the map in to a predetermined zoom level.
- Zoom Out: This button will zoom the map out to a predetermined zoom level.
- Auto Center: Toggles the Auto Center feature. When enabled, the map will automatically pan to your aircraft's location, keeping it centered as you fly. Manually panning the map will automatically disable this feature. You may reenable it at any time.
- Smart Zoom: Toggles the Smart Zoom feature. When enabled, the map will attempt to intelligently zoom in and out based on your current aircraft speed and altitude. Manually zooming the map will automatically disable this feature. You may reenable it at any time.
- Power Off: Double-click or double-tap this button to turn off the Pilot GPS map, returning you to the initial map theme selection screen.
- Return to AeroPad Home Screen: Click or tap this to return to the AeroPad Home screen.
- Manual Zoom Controls: Zooms the map in or out. These can be used to more granularly control the zoom level of the map.
- Aircraft Position: Represents the aircraft's current position on the map. The aircraft turns based on your current heading.
- Groundspeed: Your current groundspeed in knots.
- Heading: Your current heading.
- Altitude: Your current altitude above sea level.
Airport Finder & Departure/Arrival Airport Information Overlays
The Airport Finder & Departure/Arrival Airport Information Overlay features work nearly identically. The main difference is that the departure and arrival airport information buttons use your active flight plan to provide one-click or one-tap shortcuts to those airports, whereas the Airport Finder allows you to enter an ICAO code to look up information about any airport in our database.
The information provided will appear similar to the image below.
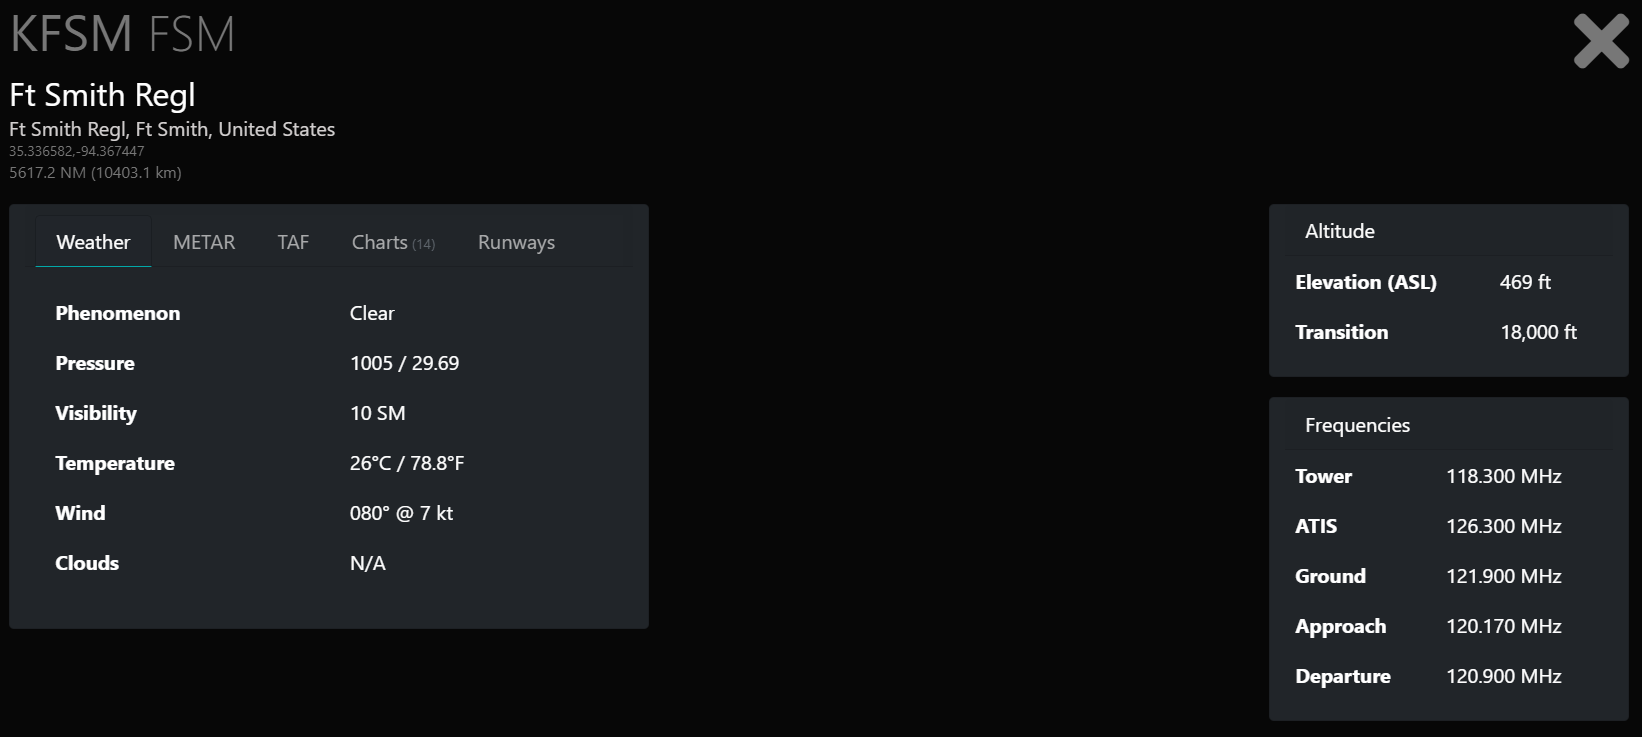
The information provided includes:
- Airport ICAO & IATA identifiers (where applicable)
- Airport name
- Airport location
- Airport coordinates
- Current aircraft distance from the selected airport in nautical miles and kilometers
- Decoded weather (where available)
- Raw textual METAR (where available)
- Raw textual TAF (where available)
- Charts (where available, and if you have them synced in LRM)
- Suggested runways based on wind direction
- Airport elevation
- Transition altitude
- Communication & weather frequencies (where applicable)
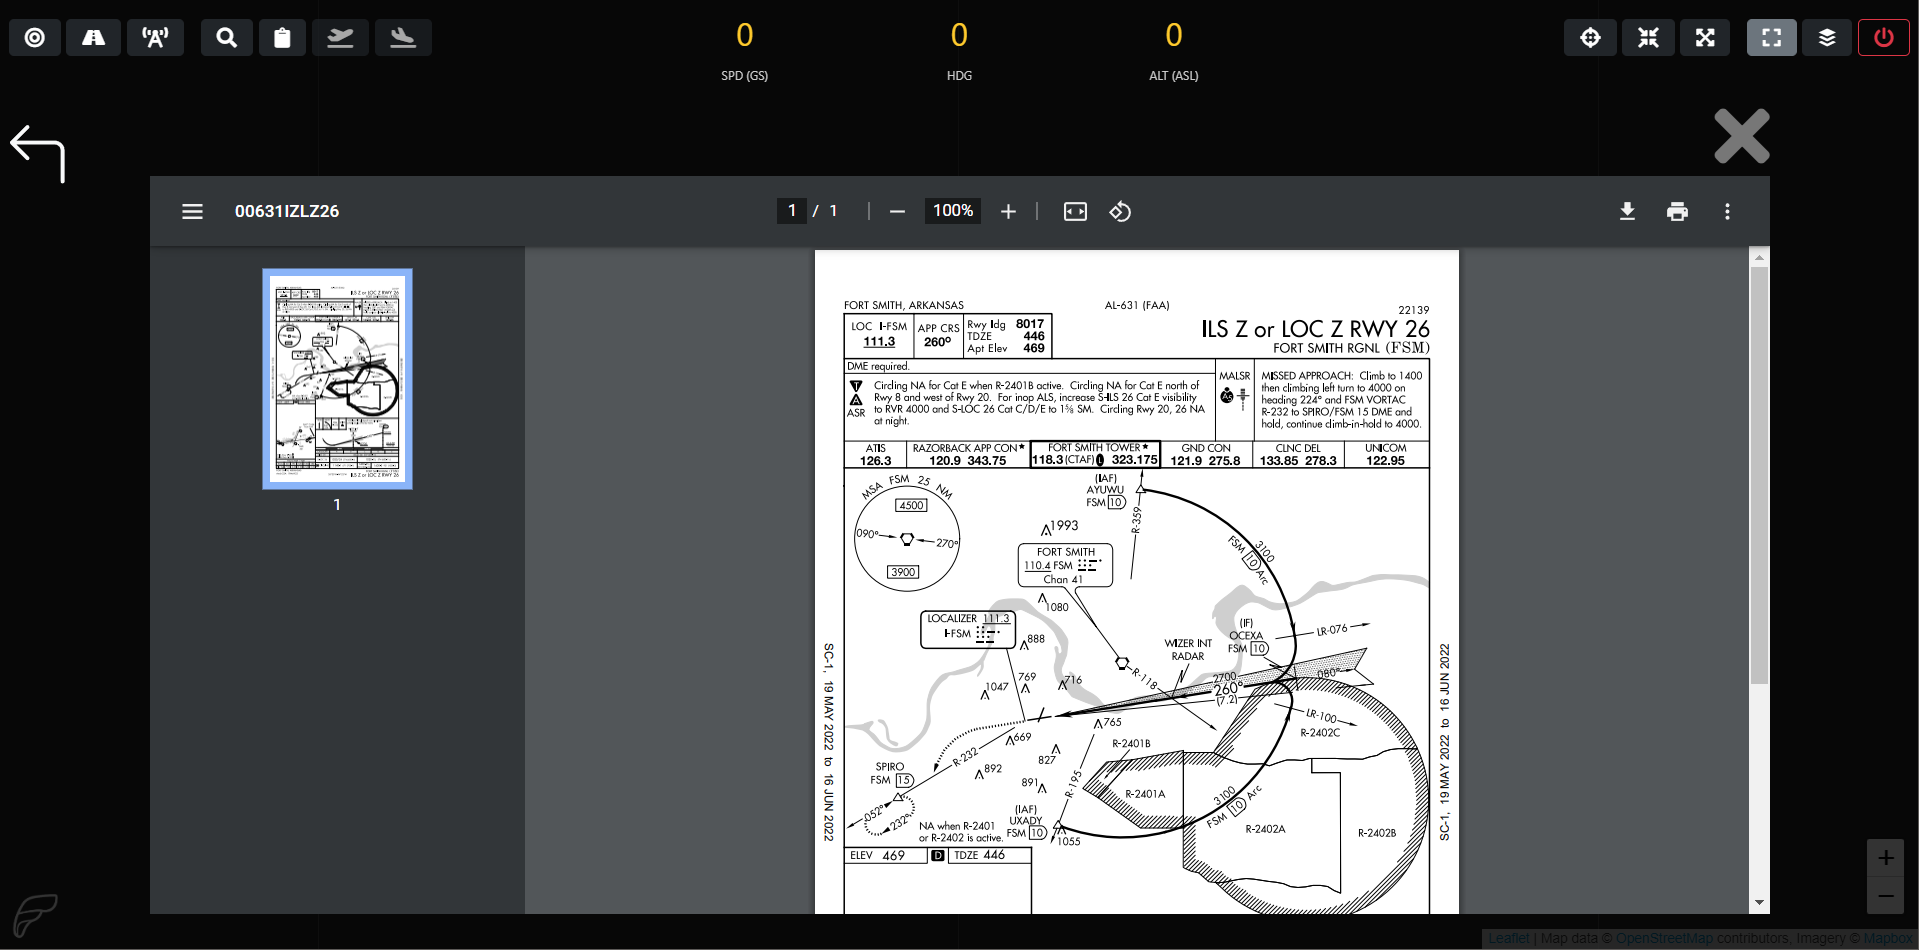
Viewing Charts
Charts can be viewed inside the Pilot GPS app. To display charts, you must have added them to your Flight Bag in FsHub and synced them using LRM.
If you are unfamiliar with how to sync charts from FsHub to LRM, please see our guide on how to sync charts.
Once they're synced, you can view the charts by going to the Charts tab of the appropriate airport's information overlay and clicking or tapping on a chart name. This will open a chart viewer inside the Pilot GPS app similar to the image below.
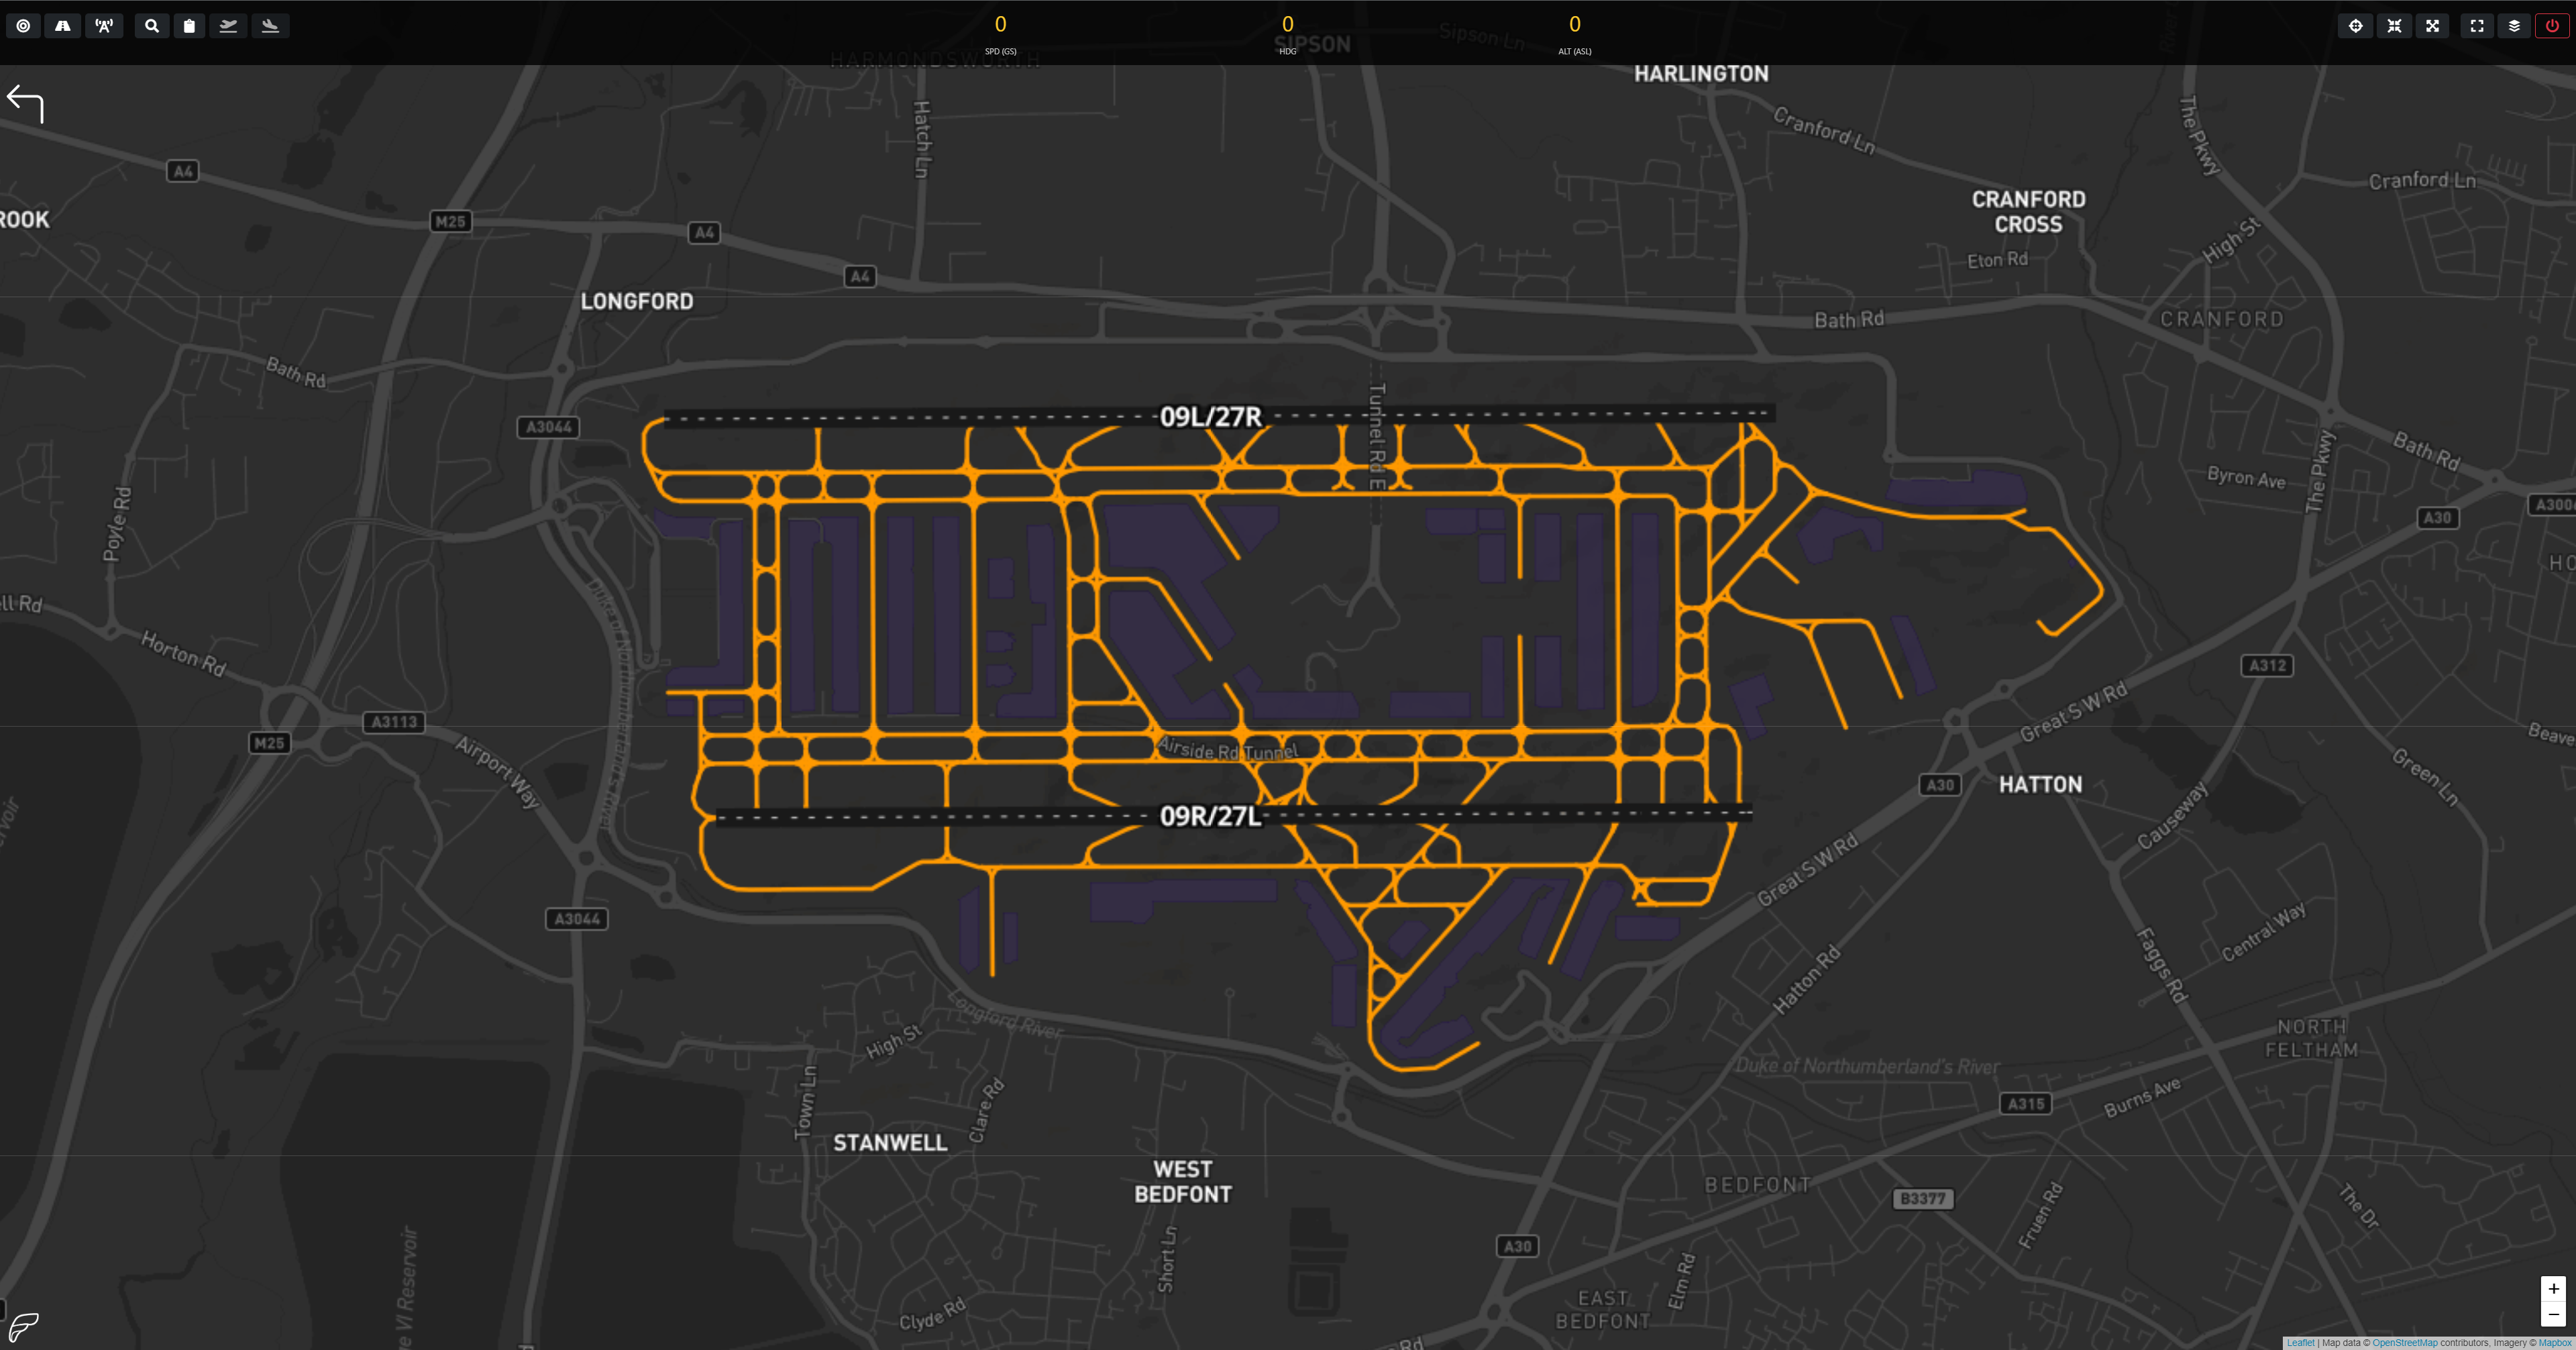
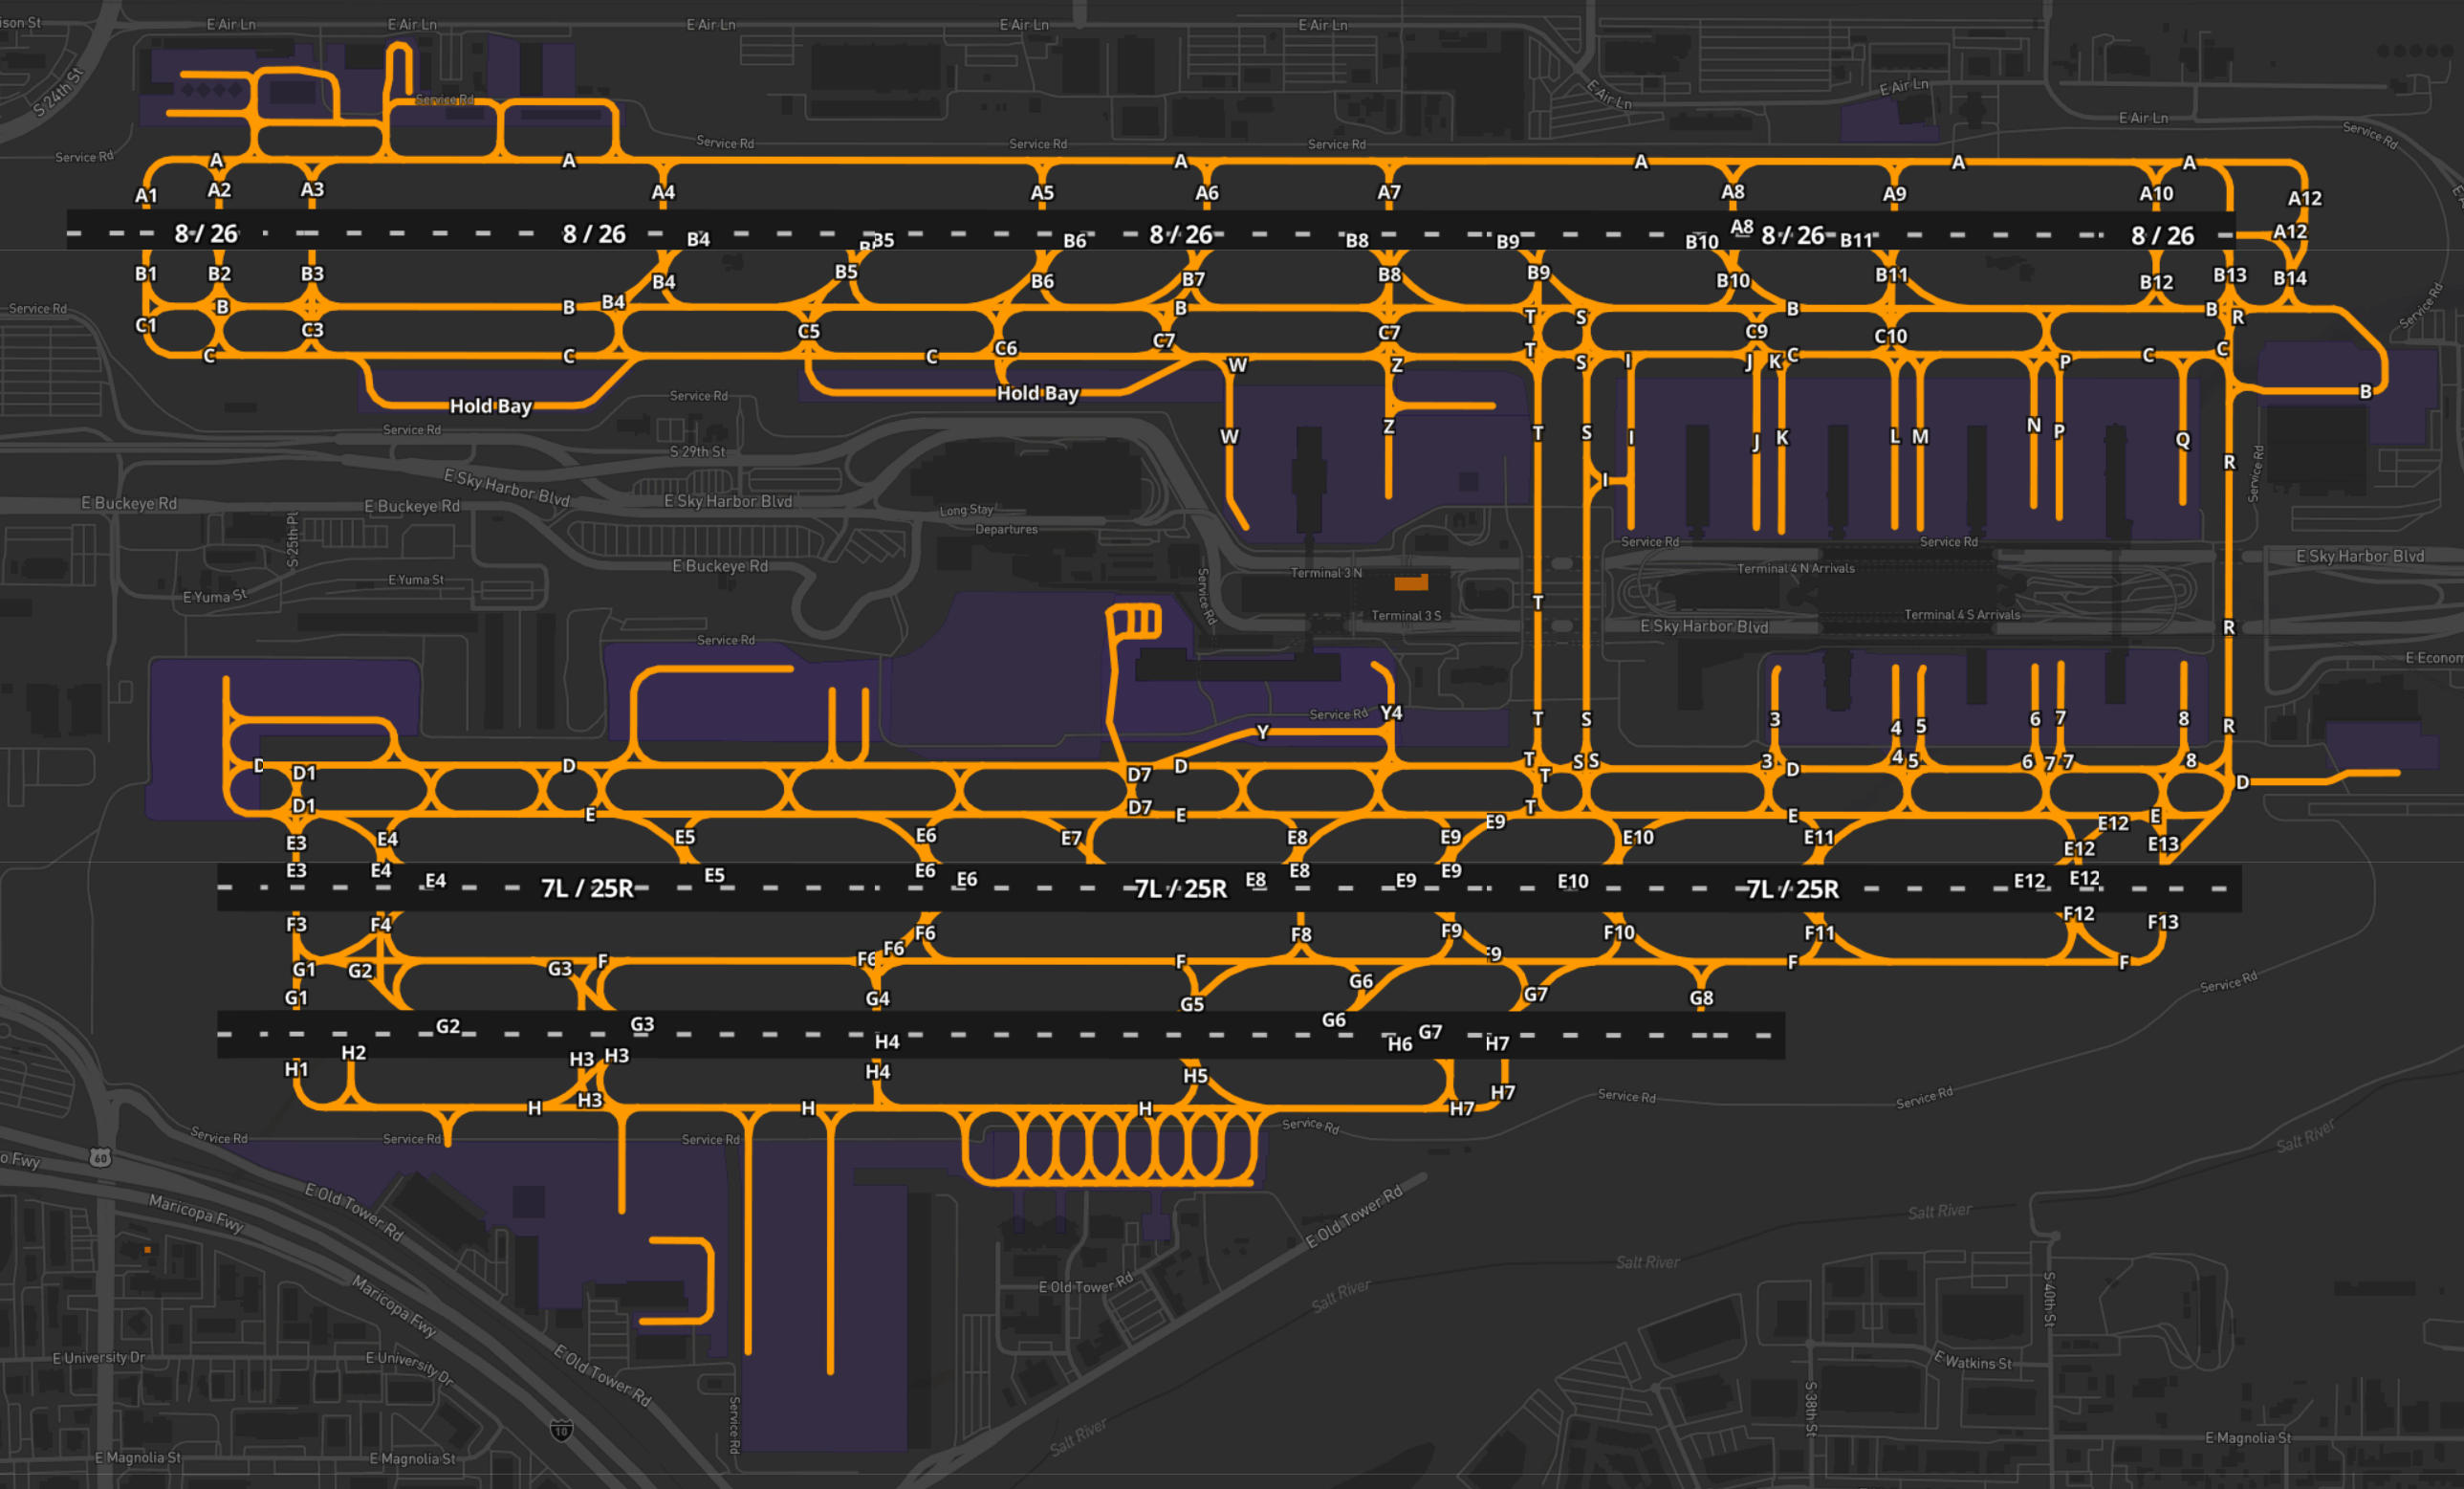
Airport Layout Diagrams
Thanks to OpenStreetMap data, the Pilot GPS can also be used to display detailed airport layout information right within the map, including runways, taxiways, aprons and gate numbers! This means that you can use the Pilot GPS as a moving map while taxiing around airports. This is especially useful if you are unfamiliar with an airport, or if you've been given taxi instructions while flying online.

NOTE: While OpenStreetMap data is quite extensive and comprehensive, not all airports feature the same level of detail as others. However, because of the open source nature of the OSM platform, anyone is welcome to edit the map data as necessary. If you find yourself visiting some airports frequently and would like to improve the data for those airports, we recommend going to https://www.openstreetmap.org/ and making any changes as needed. More information about how to do that can be found on their website. Also note that any changes made to OSM data will NOT appear immediately. At this time, we are unsure how often MapBox updates their map tiles, so changes could take some time to appear in Pilot GPS.
Using High-Resolution Map TIles
By default, the Pilot GPS app uses lower-resolution tiles. As a result, map text may be easier to read for some users, but not as much data may be viewable at once on your screen.
If you prefer to use the high-resolution map tiles, go to Services > Preferences in LRM and check the box next to “Prefer high-resolution tiles” and then close the window. You may need to refresh the Pilot GPS page or restart the Data Connector for the changes to take effect.
Using high-resolution tiles has the benefits of making the map image clearer and allowing more details to be displayed at once, but the text and map elements will appear smaller, though should still be easily readable for most users.
To help illustrate the difference, here are two screenshots of the same airport at similar zoom levels:
High-Resolution Tiles

Low-Resolution Tiles